

Before we begin, I have a confession: I don’t like sauerkraut. There, I said it. Phew! I find storebought kraut to be mushy, salty, and vinegary. Homemade is a big improvement. I’ll eat it on Ruben sandwiches, in one specific pork dish, and in a recipe Grace makes, but that’s it. Other than those, I prefer my cabbage braised or with corned beef. Heck, I don’t even like coleslaw!
However, I live with four people who love sauerkraut. Not only do they enjoy it, but it’s good for them. Liam and our kids have an autoimmune disorder that affects their guts. Fermented foods contain probiotics that improve gut health, so I try to keep them in kraut.
Like most things in my kitchen, I make sauerkraut in bulk. I ferment in a five-gallon crock I bought years ago. The crock does double duty by making kraut and decorating my kitchen. However, a super-cool crock isn’t necessary to bulk ferment. You can get the same results using a food-grade 5-gallon plastic bucket.
Some folks make sauerkraut in small batches in mason jars. This doesn’t require any special equipment, but there are fermenting lids, like these, that my friends say make it easier. Here’s a link to a post by Jill at The Prarie Homestead on how to ferment kraut in a jar. I don’t use this method, but I believe it moves a little faster than fermenting in bulk.
Many people think sauerkraut is pickled cabbage, but there’s no vinegar involved. It’s actually cabbage that’s thinly sliced, brined, and allowed to lacto-ferment. Because the good (probiotic) bacteria occur naturally on cabbage leaves, there’s no need to add cultures, hold your mouth just right, or murmur secret incantations. The process is easy! It also requires very little hands-on time. However, fermentation does take 2-4 weeks depending on the temperature, size of the pieces, and how ‘ripe’ you want the finished product. My crew likes it pretty “sauer’ed”, so we average about four weeks per batch.
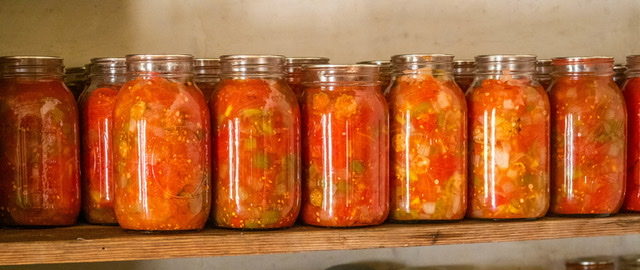
Today, I’m going to walk you through the process from start to finish. If your crew loves kraut, try making it in bulk. When our batches are finished, part of each is kept in the fridge to be eaten ‘fresh’, and part is canned for later use. The canning process kills the probiotics, but as I said my crew loves it anyway. I have a post coming in a week or two that’ll guide you through the process of water-bath canning it. (It’s super easy, and there’s no expensive equipment required.)
Now, let’s get started fermenting:

This is my handy-dandy 5-gallon crock, but remember a food-grade bucket will work as well! Basically all you need is a large-mouthed non-metal container. Metals can be corroded by the strong salt solutions used in fermenting. I use metal utensils, but only briefly and then they’re removed and washed. I don’t let kraut sit in a metal container or let metal utensils sit in kraut.
For this batch, I used six large heads of cabbage. The rule of thumb is about one quart of kraut from each medium head. This batch filled my crock about 2/3 of the way and yielded almost ten quarts.

Start by finely slicing and breaking apart the cabbage, then pick out any thick rib sections. There isn’t a hard and fast rule for the size of slices. I try to balance the fact that it needs to be fine enough to ferment effectively, but thick enough to have decent texture. (When they’re finished, really fine shreds seem smushy to me.) I average 1/4″ slices.
By the way, I have a mandolin and use it constantly. However, I don’t use it for slicing cabbage. With the mandolin, cabbage sections come apart. That way, I end up with both shreds and loose leaves. It goes more quickly (and evenly) if I slice with a sharp knife. (FYI: My mandolin is a twenty-year-old OXO. I love it, but the new model is a little pricy. If I had to replace it, I’d try the one at the link above.)
After the cabbage is sliced, weigh a pound of it into a large bowl. I add two teaspoons of salt per pound of cabbage. The salt you need is non-iodized canning/pickling salt. This salt is available at most grocery and big-box stores. Sometimes it’s with canning supplies and sometimes with baking stuff.
After the salt is mixed in, you need to mash the cabbage. This releases the juices. Old-timers had wooden tools designed to crush the cabbage. I don’t have a tool like that, so I use my potato masher. In theory, this should release enough juice to cover the cabbage. However, my janky shoulder isn’t up to that much bashing. So, I do what I can and then top it with a simple brine. (Some people use more or less salt, but I find this ratio makes consistently good batches. We rinse the sauerkraut before we eat it to cut down the saltiness of the final product. )

As each pound of cabbage is salted and ‘pounded’, I add it to my crock. When I’m finished salting and bashing, I top it with brine. If you get enough juice to cover the cabbage, you don’t need to add brine. I’ve never had a batch that didn’t need brine, but I know others do. (I think they’re better bashers.)

The brine I use is 0.2%. This means that there are 20 grams of salt in each liter of water. It’s simple to make. I fill a two-liter pitcher with warm (not hot) water and add 40 grams of salt. I stir this mixture until the salt dissolves and pour it over the cabbage in the crock. I continue to add brine until the level is over the kraut by an inch. The cabbage will float, so you need to push it down to check the level of the liquid.
When it’s topped with brine, you need to weigh the cabbage down to keep it from being exposed to air. The fermenting process is anaerobic. This means that it needs to happen under the liquid away from air. So, I scrape the sides to be sure there’s no cabbage trying to scraggle up the sides. Then, I invert a plate over the top. (The plate sits on the cabbage INSIDE the crock. It isn’t simply a lid on the crock.) I fill a mason jar with water, pop an old lid on it, and use it as a weight on the plate. This keeps my cabbage under the brine.

The jar is on the plate rim to keep the metal out of the brine. 
There were still a few scraggelers, but I check it daily. When they soften, they stay under better.
Finally, I cover the crock with a clean cloth. The cloth keeps bugs, dust, and other debris out. It also allows the gasses from the fermentation process to escape. You must allow this process to breathe. I’ll admit the first few days, my kitchen smells a little ‘cabbage-y’. The smell doesn’t linger throughout the process.
—>INSERT PHOTO OF COVERED CROCK
Then, we wait. As fermentation happens, air will bubble up. You’ll hear ‘blub-blub’ sounds as it goes and that’s normal. I check the kraut each day or two, and it only takes a couple of minutes. If the brine level drops due to evaporation, I mix some and top it up. I keep the brine at least an inch above the cabbage. I think I topped up my last batch twice during the month it fermented.
Mostly, when I check it, I look to see if I need to skim the top. During the fermenting process, harmless airborne yeasts (and some that are on the cabbage) can cause a white overgrowth on the surface of the brine. This needs to be skimmed off. Again, it’s harmless, but the growth needs to be controlled. I simply use a spoon and scoop off any film into a bowl and throw it away. There’s no need to be fanatical about it, just consistent.

After a week, I begin removing the jar and plate to check the kraut. It’s easy to see when the process really gets going, because, the look of the cabbage changes. It goes from opaque and bright green to translucent muted green. When I peek, if it looks like sauerkraut instead of fresh cabbage, it’s time for a taste test. I pull a bit out, rinse it, and have Grace taste it. (She’s our resident sauerkraut aficionado.) If it isn’t ready, I scrape the sides, push down the cabbage, and replace the plate and jar (after rinsing them).
After a month, the overgrowth becomes more pronounced. This overgrowth is white to beige and smells like bread yeast. Keep removing it, but know that it isn’t harming your kraut. If your kraut develops any colorful or foul-smelling growth, the kraut must be discarded. These growths may be mold. Brining in the 2% salt solution and keeping the cabbage beneath the surface helps inhibit the growth of mold. I’ve never had a batch develop mold, and I’ve made a LOT of kraut. However, I look carefully each time I make it. In our kitchen, we follow the old saying: “If in doubt, throw it out!” Don’t gamble with your family’s health.

White film of yeast overgrowth 
Skimming the surface 
The kraut after one month.
The above pictures are after one month. The white film is the growth of one night! However, I bake constantly, so there may be more yeast in the air of my home than is average. I simply use a spoon, skim it off, and discard it. There’s no need to obsess about getting it all. It’s harmless. (Unless you have a condition called ‘candida overgrowth’. In that case, please speak with your doctor before adding fermented foods to your diet.)
When a bite of the kraut above passed Grace’s taste test, we knew it was done! Two quart mason jars were packed tightly with kraut, topped with brine, and placed in the fridge. Ruben sandwiches were served for supper, and the rest of the batch was water-bath canned for future use.
See, making sauerkraut is easy! The hands-on time is short, and the only snag is the month you have to wait for that Ruben sandwich. As I said, I have a post coming that’ll show how to can sauerkraut and make it shelf-stable. Grace is also planning to write a guest post featuring her favorite way to eat sauerkraut. It’s one of the weirdest recipes you’ll ever see, but it’s truly delicious!
Please join us as our ‘kraut-y’ adventures continue! Do you make kraut at home? Have you ever canned food? What’s the WEIRD recipe your family loves? I’d love to hear from you!

This post has been shared at some of our favorite blog hops and linky parties. If you have time, check out some of the great information being shared at these get-togethers!


